
How to Use a Horizontal Drill Guide?

A Horizontal Drill Guide helps keep a drill bit aligned when a straight-down approach is impractical. It can support controlled drilling into the side of a workpiece, but it cannot correct every setup problem. A stable surface, the right bit, and careful alignment still matter. Small errors show quickly: the bit may wander, the hole may sit off-center, or the guide may shift under pressure. That is why preparation deserves as much attention as drilling.

This introduction uses a fictional tooling specialist, Alex Morgan, for an illustrative quote: “A guide improves alignment; it does not replace a steady setup.” Treat that as a practical principle, not a sourced quotation. The sections ahead explain how to inspect the guide, secure it, align the bit with the mark, and drill with measured pressure. You will also see where common mistakes begin, such as clamping on an uneven face or rushing the pilot hole. Keep the workpiece supported. Check the angle twice. Then proceed slowly. Even experienced users can overtrust a guide, and that is worth remembering.
How to Use a Horizontal Drill Guide?

Identify the Horizontal Drill Guide and Its Main Components

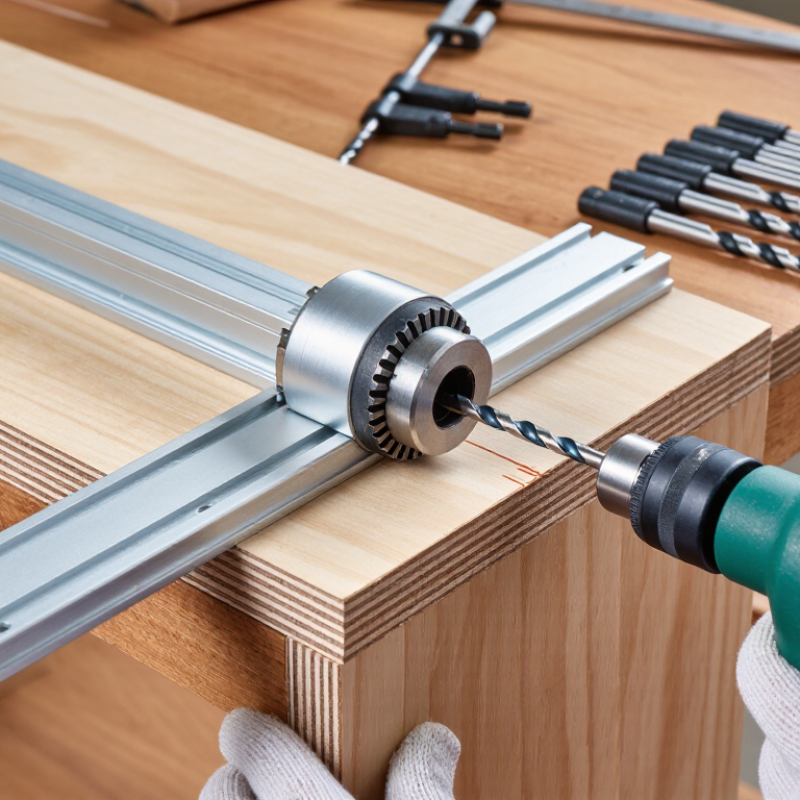
A horizontal drill guide helps keep a drill aligned while making holes through the edge or face of a workpiece. Its exact layout varies, but most models share a base, an alignment fence, and a drill bushing. The base rests against the material, while the fence registers against an edge or reference surface. The bushing is a hardened sleeve that supports the bit and limits sideways movement. Small differences matter.

Look for adjustment marks or a scale if the guide sets drilling height or angle. Some designs also include a clamp, depth stop, or replaceable bushings for different bit diameters. Before drilling, check that the guide sits flat and that the bushing matches the bit. A loose fit can let the bit wander. A tight clamp helps, but it should not shift the workpiece out of position. The scale can be misleading if the fence is not seated against a clean edge. I would verify alignment on scrap material; it takes a little time, and the result may still need adjustment. Keep hands clear of the bit path, and inspect the guide for wear or looseness before use.

How to Use a Horizontal Drill Guide? - Identify the Horizontal Drill Guide and Its Main Components
Component How to Identify It Main Function Practical Check Before Drilling
Guide body or base The main frame that rests against or is held on the workpiece. Supports the guide and keeps the drill aligned with the selected drilling direction. Check that it sits firmly and does not rock on the workpiece.
Drill guide bushing A hole or metal sleeve through which the drill bit passes. Helps constrain the bit’s path and reduces sideways movement at the guide. Use a bushing that fits the intended bit size; confirm the bit turns freely without excessive looseness.
Angle-adjustment joint A pivot, hinge, or angled setting on adjustable guide models. Sets the drilling angle relative to the workpiece surface. Set the desired angle and verify it against the guide’s markings or with a suitable angle-measuring tool.
Locking knob or clamp A knob, lever, or clamp associated with an adjustable joint or guide position. Secures the selected angle or position so it does not shift during drilling. Tighten it securely by hand and recheck alignment before starting the drill.
Reference face or fence A flat edge or surface that registers against the workpiece. Provides a repeatable reference for positioning the guide and keeping holes consistently located. Keep the reference face flush against a clean, straight surface or edge.
Workpiece clamp or hold-down A built-in clamp, strap, or separate clamp used to hold the guide or material. Limits movement of the guide and workpiece while drilling. Secure the workpiece and guide without obstructing the drill path.
Depth stop (if fitted) A collar, stop, or adjustable feature that limits how far the bit advances. Helps control hole depth, especially for blind holes. Set the stop for the required depth and make a test hole in scrap material when precision matters.
Drill bit and drill clearance The bit is fitted in the drill and passes through the guide opening without contacting the frame. Creates the hole while the guide helps maintain the intended direction. Confirm the bit is sharp, properly secured in the chuck, and clear of the guide throughout its travel.

Prepare and Secure the Workpiece

Before using a horizontal drill guide, prepare a flat, stable work surface and inspect the workpiece for cracks, knots, or loose layers. Mark the hole center clearly. Check that the guide’s base sits flush and that the drill bit can travel without hitting the bench. A slight gap can pull the bit off line. It is easy to miss.

Clamp the workpiece firmly, close to the drilling area, but keep clamps clear of the bit path. For round stock, use a V-block or another support that prevents rolling. Test the setup by applying gentle hand pressure; the piece should not shift. Wear safety glasses and remove loose sleeves or jewelry.

Tips: Use scrap wood beneath the workpiece to reduce tear-out. Tighten clamps in small adjustments, then recheck alignment. If the setup feels awkward, pause and reposition it.

The U.S. Bureau of Labor Statistics reported 2.6 million nonfatal workplace injuries and illnesses in private industry for 2023. That figure is not specific to drilling, but it reinforces the value of controlling materials and keeping hands away from moving parts. A secure setup may take an extra minute. That is usually time well spent.

Set the Guide’s Position, Angle, and Drill Bit

Place the horizontal drill guide on a stable bench and clamp the workpiece so it cannot shift. Mark the hole center clearly. Move the guide until its bit path meets that mark, then tighten the base or clamps. Check alignment from the side and above; a pencil line can look centered from one direction but miss from another. Small errors matter.

Set the guide’s angle using its scale, then lock the adjustment before drilling. For a square hole, confirm the guide sits at 90 degrees to the work surface. For an angled hole, check the setting against a protractor if the scale is hard to read. A quick test in scrap wood helps reveal wobble or drift. It may feel like an extra step, but skipping it can cost a workpiece.

Tips: Choose a straight bit suited to the hole size and material. Make sure it fits the guide’s drill sleeve without excessive play. Keep the bit’s tip on your mark, start at a controlled speed, and feed steadily. Stop if the bit binds, then inspect the alignment and clamps before continuing. A slightly crooked setup can be annoyingly easy to overlook.

Drill the Hole with Steady, Controlled Pressure

How to Use a Horizontal Drill Guide?

Drill the Hole with Steady, Controlled Pressure

A horizontal drill guide helps keep a bit level, but it cannot correct a rushed setup. Place the guide firmly against the workpiece and check that its base sits flat. Clamp the material so it cannot shift. Mark the hole’s center clearly, then align the guide before switching on the drill. A small alignment error can become obvious once the bit enters the wood.

Start the drill at a low speed and let the bit touch the mark gently. Apply even pressure through the handle; avoid leaning your full weight into it. Let the bit cut at its own pace. If it binds, stop the drill, withdraw the bit carefully, and clear the chips. I sometimes find that slowing down feels less efficient, but it usually leaves a cleaner hole. Keep your eyes on the guide and your hands clear of the rotating bit.

Tips: Use a sharp bit and test the setup on scrap material. Keep the drill square to the guide, and pause if the base begins to move. Steady pressure beats force.

Check the Hole and Clean the Guide After Use

How to Use a Horizontal Drill Guide?
Check the Hole and Clean the Guide After Use

After drilling, keep the workpiece clamped until the bit stops completely. Withdraw the bit straight, then inspect the hole under good light. Look for a round opening, clean edges, and a consistent exit. A ragged rim may point to a dull bit, weak support, or a guide that shifted. Check the hole against the intended fastener or a spare dowel; visual judgment can miss a slight angle. Small errors matter.

The U.S. Bureau of Labor Statistics’ Employer-Reported Workplace Injuries and Illnesses, 2023 reported 2.6 million nonfatal cases in private industry. That figure is not specific to drilling, but it supports taking routine equipment checks seriously. Disconnect the drill or remove its battery before cleaning. Brush chips from the guide’s bushing, slots, and contact face; packed dust can affect alignment next time. Wipe it with a dry cloth, and use moisture only if the care instructions allow it. Check for burrs, looseness, or residue. It is tempting to rush this step; grit is easy to miss. Store the guide dry.

Request a Quote